
Warenkorb-Inhalte laden...
Lightroom: Best Export Settings for Instagram 2024
Update: This blog post has been updated and expanded to the best of my knowledge to ensure optimal image quality on Instagram in 2024. The original version of this article was published in 2019.
With around two billion active users, Instagram has long been the undisputed number one photo sharing platform in the world.
A fact that, over the course of time, has also attracted more and more professional photographers to the site, who can present their highly polished images to a wide audience free of charge – which of course completely contradicts the original idea of the app. The idea was to be a platform for purely mobile photography: from smartphones to smartphones.
So it’s no wonder that Instagram soon threatened to collapse under the pressure of ever-increasing DSLR exports.
A reaction was therefore not long in coming. As a company, it is of course Instagram’s goal to reduce file sizes on its servers so that as many images as possible can be stored for as little money as possible. To achieve exactly this, an algorithm is now being used that mercilessly compresses resource-hungry uploads and prioritizes smaller file sizes over image quality.
So far understandable? Good! But that doesn’t automatically make the end result look worse.
To bypass the algorithm, the trick is to export images with certain settings that keep file sizes small from the outset – without sacrificing quality.
How this works in Lightroom is explained below.
The maximum resolution for Instagram
On Retina devices, Instagram processes images in two different ways: the maximum length on the longest side is up to 1,350 pixels for portrait images, and the maximum length of the longest side for landscape images is up to 1,080 pixels. If, for example, a portrait image is larger than 1,350 pixels in vertical length, there is a danger that it will be „broken“ by the algorithm during upload. The same applies to landscape images; here a horizontal length of 1,080 pixels should be maintained.
In the export screen you should also activate the option „Do not enlarge“. This will prevent upscaling problems if your images are below the specified dimensions.
What aspect ratios does Instagram support?
Since August 2017, you no longer have to limit yourself to the square 1:1 ratio, but now have four native aspect ratios to choose from:
- Square – 1:1 (maximum length 1,200 pixels)
- Landscape – 1.91:1 (maximum length 1,080 pixels)
- Portrait – 4:5 (maximum length 1,200 pixels)
- Versatile – 4:3/3:4 (maximum length 1,200 pixels in portrait format, 1,080 pixels in landscape format)
The Versatile aspect ratio can be used in both portrait and landscape mode.
Three of these ratios are offered as standard in Lightroom’s Crop function. Only the ratio 1.91:1 has to be entered manually. Select „Custom“ and enter 1,91 and 1.

Which color space should I use?
Even if you may not be familiar with color spaces, you’ll be able to tell the difference between a perfect instagram image and a desaturated, green-tinted something.
The color space refers to the spectrum of colors that can be represented in an image. Science, of course, goes much deeper – SLLounge has all the details. To share your images on the Internet, however, at least a little basic understanding is required.
When exporting from Lightroom, you have different color spaces at your disposal. Internet browsers or apps such as Instagram, however, only display images in the standard sRGB color space, so you should choose this. If you export your images to AdobeRGB or ProPhotoRGB, the color values of your photos will shift and become tinted and desaturated.
A slight color difference that you can see between your computer monitor and a smartphone screen has more to do with calibration than with color spaces. So in this case, you don’t really have much influence.
Time to summarize all this…
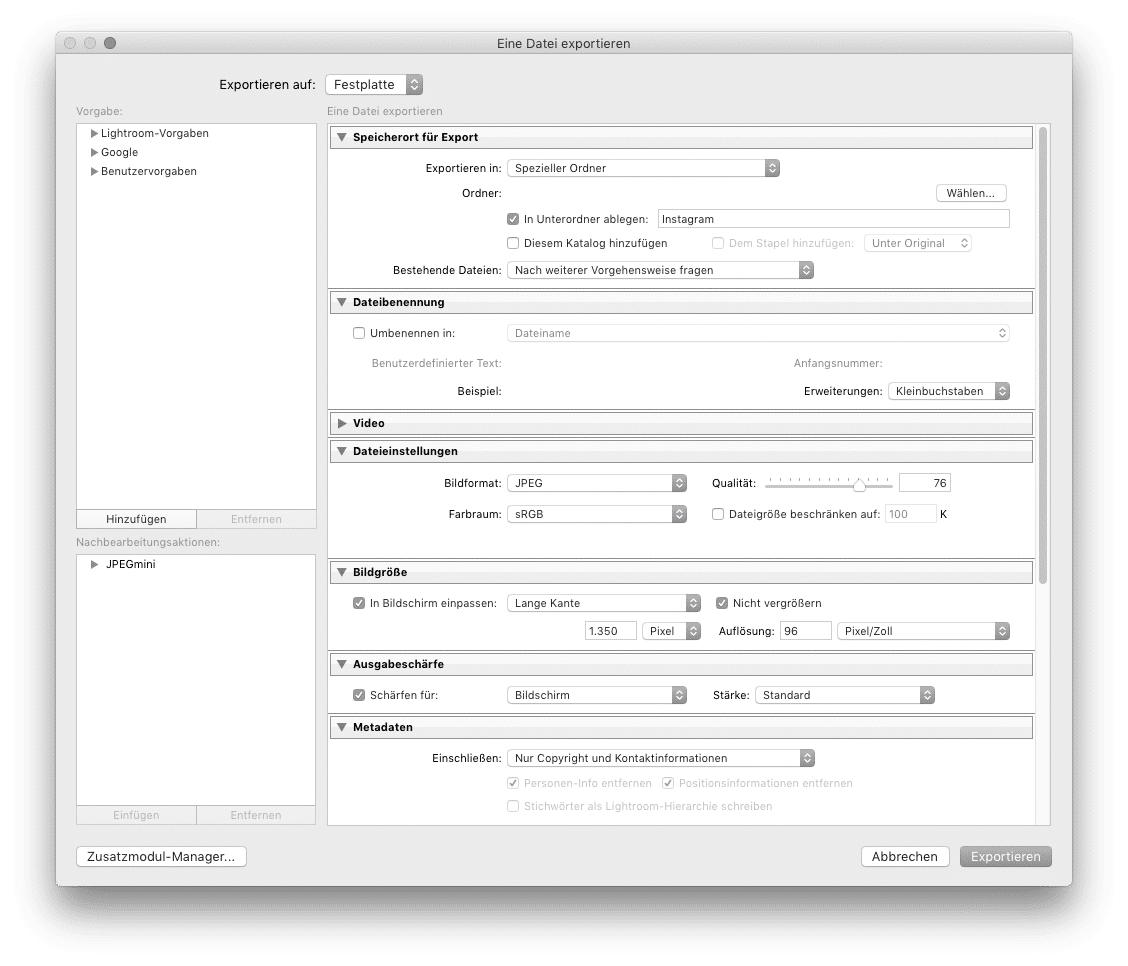
Best Export Settings for Instagram in Lightroom
- First make sure that the crop of your image corresponds to one of the four native aspect ratios (1:1, 1,91:1, 4:5, 4:3/3:4)
- You should set the quality to 76% – this is the algorithmic sweet spot between file size and image quality.
- Or: Limit the file size to 1.600kB – this probably just avoids a compression by Instagram’s algorithm
- Your picture format should be JPEG
- The selected color space should be sRGB
- You can sharpen it according to your personal taste; I usually leave the setting at „Standard“.
- You’re flexible in resolution. Since you don’t want to print the picture, you can go down to 96ppi here.
Let me know in the comments whether these tips have helped you or which settings are best for you.


